Wednesday, February 27, 2013

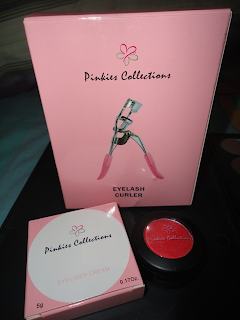
Haul: Pinkies Collections

Hello lovlies!


I just wanted to share with you a little haul which I got yesterday. :)


Pinkies Collections @ Beauty Bunker
Pinkies Collections


All the items I got were from the brand Pinkies Collections. It's a really affordable brand which has some really great products!

So, let's jump into it, shall we?

The first item that I got was a cream eyeliner. As a lover of liquid eyeliner (because of my oily eyelids), I haven't really gone and tried out any other kind of eyeliner other than the typical pencil. I actually wanted to get a gel eyeliner, but the all the makeup counters at SM seemed to have a shortage of black ones. 

As I was looking around, I spotted this little thing on the Pinkies Collections counter:


Pinkies Collections Black Cream Eyeliner @ Beauty Bunker

Pinkies Collections black cream eyeliner


Cream eyeliner. Interesting. 

Pinkies Collections Black Cream Eyeliner swatch @ Beauty Bunker
swatch


Well, I immediately knew that this wasn't going to be a product that I would be able to use on its own since it would definitely smudge all over the place due to its consistency. 

However, that's something that could easily be remedied with a bit of black powder eyeshadow on top, no biggie.

So, I went ahead and got it. It was only Php 99. An awesome deal, IMO. :)


Next, I got a super awesome eyeshadow color. ;) I was actually looking for a shadow color so I could recreate this look for a photoshoot:

red eye makeup @ Beauty Bunker
awesome red eye look!

...and I found this bad boy:


Pinkies Collections Fuchsia Red Eyeshadow @ Beauty Bunker
awesome red eyeshadow!


This shadow is named Fuchsia Red. 

These pictures really don't do the shadow justice, so here's a close up. Hopefully you see the tiny reflects that it has.

Pinkies Collections Fuchsia Red Eyeshadow @ Beauty Bunker
red with reflects

I was uber happy to find this shadow, and I was very very pleasantly surprised to find how very pigmented it was. Here's a swatch so you can see what I mean.

Pinkies Collections Fuchsia Red Eyeshadow swatch @ Beauty Bunker
swatch

I got this swatch from a single tap on the shadow. Amazing color payoff! 

( I'm actually thinking about doing a red eyeshadow tutorial for y'all. What do you think? :) )

What I love most about this shadow is that it's quite cheap at only Php 70. Great, right? ;)


Now, last but not the least, I got a new eyelash curler. My Body Shop one broke, and so I went looking for a replacement that didn't cost too much. Imagine my surprise when I saw this baby:


Pinkies Collections Eyelash Curler @ Beauty Bunker
pink eyelash curler


This eyelash curler is pretty much the exact same one as my Body Shop one, except it has pink handles which I think is adorable. :) 

This curler fits nicely on my eyes, and it doesn't pinch. It curls my lashes wonderfully! Also, it has a nice weight to it and it doesn't look or feel cheap at all.

The best thing about this eyelash curler is that it only costs an amazing Php 68. Yep, you read that right. 68-friggin-pesos. That's uber UBER cheap! Naturally, I immediately snatched it up after seeing the price tag. :p


All in all, I feel that this haul was a very, very good one, considering the great items I got as well as the really great prices of each. I definitely recommend that you check out this brand if you are looking for wonderful makeup staples which are of good quality and which are highly affordable. ;)

This brand can be found at most SM department stores, so if you are interested, check it out and tell me how it goes! :)
Monday, February 18, 2013

Haul #1: Accessories from St Francis Square!

Hello my lovelies!


Today's post will be about my first accessory haul! ;)


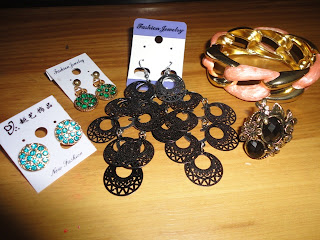
Haul #1: Accessories from St Francis Square @ Beauty Bunker
accessories!
 

I got these things from St. Francis Square (the mall-ish building in front of SM Megamall) the other week and I'm so excited to share my awesome and super affordable finds with you! :)


Let's start with the earrings. :)


Haul #1: Accessories from St Francis Square @ Beauty Bunker
pretty turquoise studs

This pair is absolutely adorable! If you've seen my mini-haul, you will know that I have been loving turquoise lately! Turquoise crystals embedded on a gold disk = uber pretty! 


Haul #1: Accessories from St Francis Square @ Beauty Bunker
emerald = color of the year. yey!

This pair is quite similar to the pair shown above, except that this pair is dangling, and it has green crystals embedded on a textured gold disk. :)

I absolutely love that I was able to get these two pairs above for only Php 40 each from Php 50! ;)


This next pair is super lovely. It immediately caught my eye! 

Haul #1: Accessories from St Francis Square @ Beauty Bunker
uber pretty gypsy-ish earrings

I love that it is nice and dangly and the detail is so so pretty! Here is a close up so you can see what I mean:

Haul #1: Accessories from St Francis Square @ Beauty Bunker
uber pretty detail!

See? :) For some reason, this design reminds me of gypsies. It's so Esmeralda, don't you think? ;) The best part is that I got this pair for only Php 50! Awesome deal! :)


Next up is the pretty ring I got too.

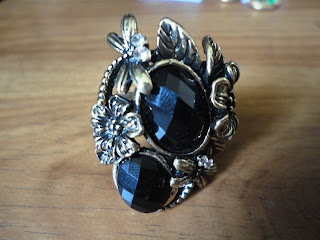
Haul #1: Accessories from St Francis Square @ Beauty Bunker
dragonfly and flower ring


It's uber lovely, don't you think? The dragonfly and flower detail looks pretty amazing to me. :) Here is another pic so you can see how it looks like from the side as well as how it looks when worn. :)


Haul #1: Accessories from St Francis Square @ Beauty Bunker
on my finger

I also like that this ring is adjustable so it can fit my super thin fingers. :) So, how much is this ring? Well, I was able to get it for only Php 80! Yey!


Last but not the least is the uber uber gorgeous coral and gold bracelet that I was able to get.


Haul #1: Accessories from St Francis Square @ Beauty Bunker
isn't it just gorgeous?

Since I have been obsessed with the color coral lately, pretty much anything coral catches my eye. If it's coral AND gold, then I absolutely, positively have to have it! 

This little cutie was practically calling out my name amidst the heaps and tons of bracelets it was buried under. I immediately dug it out (well, not really, but you know what I mean) and I swear my eyes were sparkling as I held it up to the ate and asked "Magkano po 'to?" with my voice almost trembling with excitement. 

Her answer? Php 150. Since I am trying to improve my tawad skills, I bargained and got this lovely thing for only Php 120! Not that big of a discount, but hey -- it's a start! ;)

I love that I was able to get this bracelet for such a low price. Other similar bracelets at the mall costs around Php 300. ;)

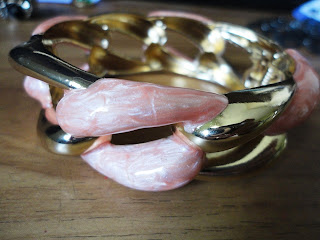
Here are some more pictures of this lovely lovely thing so you can see why I am so obsessed with it. ;)


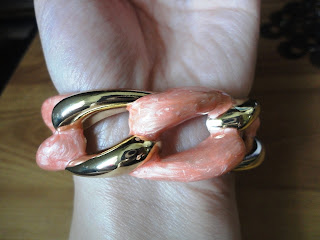
Haul #1: Accessories from St Francis Square @ Beauty Bunker
on me

I especially love the chain design it has and how nice it looks on my wrist. ;)


Haul #1: Accessories from St Francis Square @ Beauty Bunker
pretty chain design

Gorgeous, right? Told you so. ;)

All in all, I only spent Php 330 for all of these lovely accessories. ;)

If you want some really affordable accessories (and other stuff too), I swear that St. Francis is one of the best places for you to find some for yourself! :)


Whew! So that's all for my first haul! What did you guys think? Comment below! It makes my day. :)


Wednesday, February 13, 2013

Nails of the Week #3: Icy Blue

Hello there lovelies!


Here is another Nails of the Week entry for you. :)

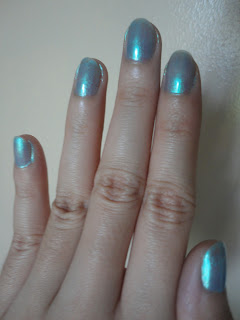
This time, I'm keeping it simple with pretty icy blue nails. :)

Nails of the Week #3: Icy Blue @ Beauty Bunker
icy blue nails


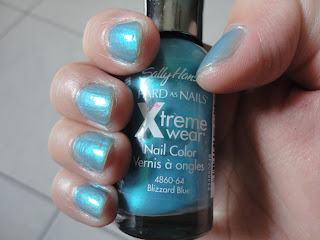
All I used for this look is some topcoat and 2 layers of this icy blue polish named Blizzard Blue from Sally Hansen.

Sally Hansen Hard as Nails Xtreme wear Nail Color in Blizzard Blue @ Beauty Bunker
Sally Hansen Hard as Nails Xtreme wear Nail Color in Blizzard Blue

I have another Sally Hansen polish of the same line, but it's a pretty baby pink color. I must say that I really love the consistency of the Sally Hansen polishes that I've tried! Unlike other polishes that tend to get thick and sticky easily, this is a polish line that doesn't do that at all even after several applications. 

This makes for really easy polishes to wear. You won't have to worry about bubbles, goopiness, and all those things with this. It dries pretty quickly too, given its slightly more sheer consistency. Although you do need to put on several coats for the color to show up, I don't really mind since the consistency is really good. :)

Well, that's pretty much it! Kind of a boring post but I just had to post some pictures of this lovely blue polish which I am loving at the moment. ;)

With that, I'm leaving you with some more pics of this pretty nail look. :)

Nails of the Week #3: Icy Blue @ Beauty Bunker
nails without flash


Nails of the Week #3: Icy Blue @ Beauty Bunker
nails with flash


What nail colors are you loving at the moment?  Share in the comments section below! :)

Tuesday, February 5, 2013

Sample Room Haul #1: Neolia, AHAVA, VM

Hi there!
Today's blog will be all about my Sample Room haul! :) This isn't really my first Sample Room haul ever, but it's the first one I'll be writing about. I do have a Sample Room review up, though, if you are interested to know more about it. :)
Well, onto the review! Here's what I got from Sample Room this time:
Sample Room packaging @ Beauty Bunker
cute packaging! 


Sample Room Haul #1 @ Beauty Bunker
here are the actual products that I got


So, let me give you a breakdown and reviews for each. :)


1. Neolia Olive Shampoo & Conditioner (Full Size 400ml / Php 310)

"An organic shampoo and conditioner that is formulated for all hair types, most especially for delicate scalp that helps reduce dandruff. Each variant has a unique ingredient to help moisturize, revitalize and moisturize both hair and scalp. Neolia products were developed without compromising the effectiveness and pureness of each product by giving greater importance to certified natural ingredients."

Here is a picture of the samples.

Neolia Olive Shampoo & Conditioner @ Beauty Bunker
10 ml sachets


Let me start with the shampoo in this duo.

I actually really love this shampoo! It's very nicely scented, reminiscent of a local shampoo brand I can't quite figure out yet. It also is quite thick for a shampoo. Its consistency is that of a nice jelly conditioner type product. 

What I like most about it is that it lathers quite well. This is something I look for in a shampoo, especially since I do get oily hair at the end of the day. With this, I don't feel the need to re-shampoo for my hair to feel clean. 


Now for the conditioner.

I don't like the conditioner, to be honest. While it smells quite nice like the shampoo, it's really, really runny. It's like watered-down shampoo -- which is a weird consistency for a conditioner. When I tried to dispense some onto my hand, it actually trickled down in between my fingers. Odd.

Because of this, I don't think I was able to get any of it onto my hair. Obviously, I can't vouch for its effectiveness.


2. AHAVA All in One Toning Cleanser (Full Size: 250ml / Php 1,095)

"A light, water-based cleansing milk for face and eyes. The triple formula effectively removes makeup, dirt, and impurities; tightens pores and rebalances the skin's pH; leaving the skin clarified, toned, soft and saturated."

"No need to rinse. Use daily, follow with proper skincare."


Here's a picture. 

AHAVA All in One Toning Cleanser @ Beauty Bunker
30ml sample


What do I think about this product?

Well, I really love it! 

This product is supposed to be able to remove all traces of your makeup, all while toning and moisturizing your skin. It's like your typical bedtime routine all in one. 

I have to say that this product may be able to do just that! 

I used this product when I sported a full-blown smokey eye (dark cream base, dark shadows, blobs of mascara -- the works!), and this was able to remove it with a swipe. Yup, you read that right. With one downwards swipe, my eyeshadow base, eyeshadow, and mascara (top and bottom) was gone. Nada. Zilch

Since my eye makeup was so dark, I had to use another cotton ball for my face, but I'm pretty sure a little blob of the product can actually take care of your whole face of makeup easily.

Cleansing -- check!

Now, what about the toning and moisturizing properties, you ask? 

A look at my pores after using this showed that they weren't quite as big as usual. My whole face also felt quite smooth and supple as well. 

Toning -- check! 
Moisturizing -- check!

It also smells quite good, which is always a plus. ;)

I have to say, though, that as an oily-skinned gal, I still wanted to clean my face through my usual routine just to make really sure that it was really clean. Dry to normal skinned gals won't necessarily need to do this, though. :)


All in all, this product is really quite great to have, especially when you travel and you do not want to lug around a whole bottle of makeup remover, a separate eye makeup remover, etc. :)


3. Venus & Mars Mineral Eyeshadow in the color Halo (Full Size: 5g / Php 145)

"It's mineral makeup in its simplest form. NO irritating components such as Bismuth Oxychloride, Boron Nitride, Parabens, Ethylene Gycol, Formaldehyde, Petroleum products, Sodium Laurel Sulfate, Carmine, and other Mineral Makeup fillers. Only what your skin needs. Now fortified with Pearl Powder and SPF 20 and infused with Vitamin E, V&M Minerals is the best that your skin can ever experience. Finally, your skin can truly breathe."


V&M Mineral Eyeshadow in Halo @ Beauty Broadcast
Shade: Halo


I had never actually heard about V&M Minerals before. Apparently, it's an online mineral makeup brand that's been around for quite some time under a different name or something to that effect. 

Anyway, I was super excited to try this out since I do love eyeshadow so much. 

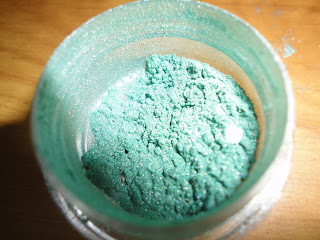
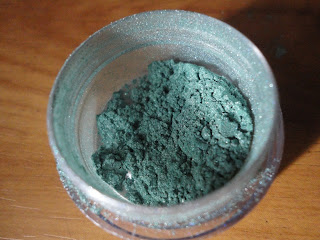
This mineral eyeshadow is in a loose mineral form like this:

V&M Mineral Eyeshadow in Halo @ Beauty Bunker
with flash


V&M Mineral Eyeshadow in Halo @ Beauty Bunker
without flash


As you can see from the pictures above, the shadow is an uber pretty turquoise color . I was really excited about this since I have nothing like it in my collection. :) 

Now, as standard with all cosmetics, here are some swatches for you to look at:

V&M Mineral Eyeshadow in Halo swatches @ Beauty Bunker
swatches

Top swatch: With ELF eye primer
Middle swatch: With LA Splash creamy shadow base
Bottom swatch: no primer or base

As you can see in the swatches, this shadow can really be more pigmented depending on its base. I recommend a good eye primer to really make this color pop on your lids. 

I like that this shade is sheer enough that it doesn't scream turquoise eyeshadow when you wear it, but it is definitely buildable if you want a more intense shade. 

I actually haven't tried this on my own eyes but I'm pretty sure it would work great. ;)


Soo, all in all, I must say that this was quite a wonderful Sample Room haul. The items that I got were mostly great! 3/4 isn't bad, is it? ;)

I totally love love love the whole concept of the site and how it gives everyone a chance to try products before deciding on whether to buy them or not!


Want to get your own samples too? Check out my Sample Room review and find out how. ;)

Friday, February 1, 2013

Nails of the Week #2: Ombré Pink and Orange


Hi guys!
Here is another Nails of the Week post for you. It's Ombré Pink and Orange nails this time. :)

Ombré nails are quite easy to do, in my opinion. Unlike your usual one color manicure, you really don't have to worry too much about pesky things like air bubbles, overly thick polish, and things like that. 

All you have to worry about is cleaning up around your nails later on! :)

Here are the things that you will need to get yourself pretty ombré nails. 
 

Nails of the Week #2: Ombre Nails @ Beauty Bunker
things you'll need

Of course, you don't have to have exactly the same colors. Switch them up to suit your preference. :)

I used: 

3 nailpolish colors in the same-ish color family for the gradient effect
(in order from left to right)
  • Twinkle Nail Sparkler in Neon Pink (a true neon pink color)
  • Colortrends Nail Polish in Orange Float (a medium orange color with teenie tiny glitters)
  • Twinkle Nail Sparkler in Carnation (a slightly frosted medium pink color)


Topcoat (Bobbie Basic Top Coat)

Base color 
  • Pure Ice in First Love (a pearlescent pink color)

Makeup/cosmetic sponge (the sponge in the picture above is what yours should look like while doing your nails ;) )


Soo, here's what I did:


Nails of the Week #2: Ombre Nails @ Beauty Bunker
yey for step-by-step pictures!

1. Apply the base color of your choice. I used the pearlescent pink for this. 

2. Blob some of your 1st gradient color onto the edge of your makeup sponge, and apply to about 1/2 of your nail in dabbing motions. I chose orange. 

3. On another corner of the sponge, blob your second color. I chose the neon pink. This second color is your "medium" blending color to blend together the 1st and 3rd colors you will be applying. Make sure that when you dab this color on your nail, you will do so on only 1/3 of your nail

4. On yet another corner of your sponge, blob on your 3rd color. I chose the medium pink. Dab this color onto the very tips of your nails. 

5. Add topcoat, and you're done! :)

Here is the finished look. :)

Nails of the Week #2: Ombre Nails @ Beauty Bunker
right hand

Nails of the Week #2: Ombre Nails @ Beauty Bunker
left hand


Now, here are some very, very useful tips while doing this:

1. Always dab the color upwards from the tip of your nail. This will ensure that you get the most product at the tips of your nails, and you get a faded effect near your cuticles. Make sure you do this for all 3 colored layers so the colors will blend together well. 

Here is a photo for reference.

Nails of the Week #2: Ombre Nails @ Beauty Bunker
faded gradient effect, check!


2. Always let the layer dry first before adding a new one! This is so you won't ruin the layers beneath. 

3. Don't get scared if it looks totally crazy at first! Just keep dabbing. ;) Once you put on topcoat, the look will come together, I promise! This look is very forgiving on mistakes since not every nail has to look alike. :)

4. Up close, your nails may look totally kuh-razzeeh, but don't worry, it will look great from afar. Haha! :) Also, once the bumps have been worn down (from bathing, washing your hands, etc) it will look even better. :)

5. Try all the steps on 1 nail first until you get the hang of it. It will save you time and energy on fixing mistakes on every nail later on. ;)


Well, that's it for this tutorial. :) 'Til next time! :)