Sunday, March 10, 2013

FOTD # 3: Teal and Peach

Hello, lovelies!
This post is going to be all about another FOTD I came up with. :) 
 

FOTD # 3: Teal and Peach @ Beauty Bunker


This is a look which I wore about a month ago, but which I never got around to writing a blog post about.

It's a really simple look which features an eyeshadow pigment that I adore -- the Venus & Mars Mineral Eyeshadow in Halo (which I have a review on here btw).

I like this look since it has a nice pop of color yet it's not too terribly dramatic, in my opinion. If you like quite colorful eyeshadow looks, then this would be a nice one for you to look into.


I didn't use too many products for this look, and it is fairly easy to put together. Here are the things I used.


FOTD # 3: Teal and Peach @ Beauty Bunker


FACE
EB Concealer stick in Beige
Ellana Minerals Primer in White Chocolate and Foundation in Caramel Latte
Rimmel Stay Matte Powder
ELF blush, brozer, and highlighter palette

EYES
ELF eye primer
Le Faerie Cosmetics Palette
EB black eyeliner
Eye of Horus Mascara

CHEEKS
Maybelline Mineral Power Naturally Luminous Blush in True Peach


LIPS 
Revlon Beyond Natural Lip Tint SPF 15 in Peach


Here are some more pictures of this eye look.


FOTD # 3: Teal and Peach @ Beauty Bunker
side view-ish

Here, you can see the soft peach blush which I used to go with the peach lips. 


FOTD # 3: Teal and Peach @ Beauty Bunker
a closer look

Here, you can more clearly see the nice peach lips which I paired with the shadow. The balance of the cool-toned eyes matched with the warm nudey peach lips makes for a great combination, I think. :)


FOTD # 3: Teal and Peach @ Beauty Bunker
eye open

I achieved this eye look by applying the green pigment Halo all over my lids using a patting motion. 

(Tip: Patting pigments rather than sweeping them on is important to avoid lots of fallout and to ensure maximum color payoff!)

I then lightly used a taupey brown shade on the crease area to provide some dimension. Afterwards, I made a thin black cat eye using the black pencil liner, topping it off afterwards with some black eyeshadow. The brow area was highlighted using some concealer topped off with some powder.

To finish it off, I curled my lashes and used 2 coats of mascara. 


FOTD # 3: Teal and Peach @ Beauty Bunker
eye closed

Here, you can clearly see how the shadow was laid out. It's a pretty simple look, as I said. :)


So, what do you think of this look? Love it? Hate it? Do you want more detailed and step by step makeup tutorials with more pictures? Comment below. I'd love to hear from you! :)

Tuesday, March 5, 2013

My First "Makeup artist" experience!

Hello, lovelies!
The past week has been quite hectic for me, and so I have been unable to post on my blog. Oh well!

For this post, I just wanted to share with you my very first experience of being a "makeup artist" (I use this term very loosely). I don't have a makeup degree or certificate or whatever, and I actually only know how to slap makeup onto my own face. 

However, a cousin of mine who had just turned 18 asked me the other week to do her makeup for a little pre-debut photoshoot she wanted to have. Being an avid makeup junkie, I happily obliged. It would be a chance for me to practice my "skills" on another person, after all!


@ Beauty Bunker
feeling like a makeup-artist! ;)

I must confess, though, that I cheated. I practically didn't use any foundation on my "model". I just dusted on a bit of powder since she already has great skin. I didn't want to botch things up by slathering too much stuff onto her face, so I just let things be and just tinkered with the eyes, lips, and face. Oh, and I groomed the brows and filled them in a tad bit.

Here are some pics of what I did on my pretty model. :) 

(I actually did 4 looks, but I don't have pics of the last one, sadly)


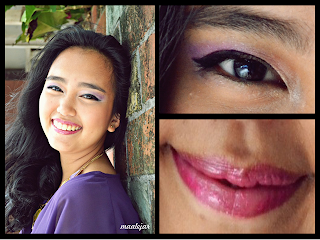
Look #1: Violet eyes & Fuchsia lips


Violet eyes & Fuchsia lips @ Beauty Bunker


This is a pretty girly-girl look with the classic combo of violet and pink. 


Eyes: You can't really see in this photo, but the lids are actually white, with a violet cut crease. To balance it out, I went ahead and gave her a medium-sized cat eye. 

Cheeks: The lighting actually washed out the bright doll pink cheeks she had.

Lips: I used a bright pink lipstick and topped it off with a very opaque fuchsia lip gloss. (which got all over her face because of the windy location!)


Look #2: Dramatic cat eye & Red lips / Pin-up


Dramatic cat eye & Red lips / Pin-up @ Beauty Bunker

Next up, this is a pretty classic pin up look, only I gave her a bronzy eye to give more definition. 

Eyes: This is a nice bronze eye with lots of medium browns and bronze shadows on the lids, then defined with a deep brown shade right on the outer-V of the eyes.This was then accentuated with a thick black cat-eye.

Cheeks: The cheeks were contoured quite a bit, and a hint of peachy blush was used to add more warmth.

Lips: The lips were painted with a nice classic red color to top off the pin up essence of this look. 


Look #3: Aquamarine & Electric Blue Eyes & Pastel pink lips

Aquamarine & Electric Blue Eyes & Pastel pink lips @ Beauty Bunker

Last but not the least is a really fun and colorful look to go with the brightly colored dress the debutante was wearing. 

Eyes: The eyes were inspired by peacock colors. First, a white-gold color was packed onto the lids and inner corners to bring lots of light to them, then the outer-V was accentuated by a nice aquamarine color. The shadows were blended out into a very elongated cat-eye like shape extending upward and out.

To add a bit more oomph to the look, electric blue shadow was used to line the outer third of the lower lash line. 

Only the upper lid was lined thinly with liquid liner just to give a bit of definition.

Cheeks: A very light touch of pastel pink blush was used on the apples of the cheeks.

Lips: The lips were finished off with a nude-y pink color so as not to compete with the loud eyeshadow. 


Soo, what have I learned from this makeup experience? 

1. Pond's Cold Cream is an AMAZING product for quickly taking off eye makeup. 

(Note: We were only given about 5 mins in between locations to change up the outfit and makeup, so being able to easily remove the eye makeup was a total lifesaver!)

2. Disposable sponge tip applicators, cotton balls, and tissue are a makeup artist's best friends!  

3. I really really need to work on my foundation and concealer skills. I have absolutely no idea on how to use them on another person! 

4. Practice makes perfect! I could've used a bit of practice time so the results would look better. :p

All in all, I really did enjoy the whole experience of getting to play makeup artist for a day. I think really experiencing this kind of thing has actually made my passion for makeup grow even more! 

Well, I'm off practice, practice, and more practice! 'Til next time!