Saturday, January 26, 2013

January Glamourbox Review

Hello guys!


Well, as you can see clearly by the title, this post is all about the January Glamourbox! I have received 2 boxes so far, and this is my third one. :)


January Glamourbox @ Beauty Bunker
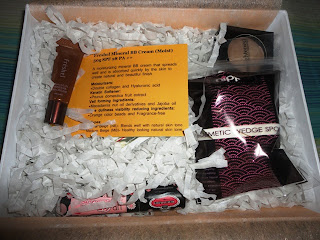
sleek white box

I actually really love the sleek white box in which the products are housed in. It's uber thick and sturdy so it's quite nice to reuse for storage. 


January Glamourbox @ Beauty Bunker
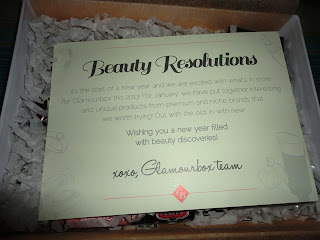
here is what the insert looks like for this month.

So, what is Glamourbox, really? Well, quite simply, it's a monthly subscription wherein you receive a box containing various beauty goodies ranging from sample sized to full sized items. :) 

The monthly subscription costs Php 595. It's a tad pricey, but I personally think it's worth it. After all, for the past 2 months, I've been receiving products in my Glamourbox that are worth around Php 1,500+! ;)

Now, I just want to say the previous 2 boxes that I received contained really, really great stuff from all sorts of big name brands such as Benefit, Yves Rocher, Shiseido, Obagi, Skinfood, VMV Hypoallergenics, Neutrogena, Issey Miyake, Bvlgari, Burberry, and a whole lot more. 

However, in this month's box, I have to admit that I was a wee bit disappointed not only by the contents, but also with the uber delayed delivery. I received mine just yesterday, but ideally, the boxes are shipped every 9th of the month. Oh well. :(

Anyway, let's move on to the actual contents of this month's box.

January Glamourbox @ Beauty Bunker
contents

So, here are the details of the contents, together with some close up shots of each.

1. EmerginC Hyper Vitalizer Cream and Aqua Mineral eye creams. 

EmerginC Hyper Vitalizer Cream and Aqua Mineral eye creams @ Beauty Bunker
i lumped them together since they were sample sizes. :)

Here are the product descriptions for each.

EmerginC Hyper Vitalizer Cream (Full size 50ml / Php 3,650)

Nourish your skin with hyper-vitalizer cream, emerginC's rich, nourishing hydrating cream that combines the super-potent "master antioxidant" alpha-lipolic acid, coenzyme Q10 and luteint.


Aqua Mineral Contura Eye Cream (Full size 30ml / Php 3,300)

An extraordinary cream created to dramatically improve the look of delicate skin around the eyes. It lessens the appearance of lines.


Aqua Mineral Juveness De-Wrinkle Cream (Full size 50ml / Php 5,000)

This outstanding face cream is a breakthrough created to instantly and dramatically improve the appearance of the delicate skin around the eyes and on the forehead.


I haven't tried any of these yet but I will be doing an update in case something "dramatic" does happen to me by using this. Ha ha.


2. LA Splash Enlightened Creamy Shadow Base in Illuminated (Full size 5g / Php 400)

Use alone or pair this cream shadow base with a pressed shadow to facilitate blending and enhance shadow color and wearability. 


Here is a picture of the product. 

LA Splash Enlightened Creamy Shadow Base in Illuminated @ Beauty Bunker
it's a pretty mushroom taupe color in the pan.

Now, I was most excited about this product since I do love cosmetics. I expected to be able to get a nice wash of a taupey mushroom color, but instead it turned out like this:

LA Splash Enlightened Creamy Shadow Base in Illuminated swatch @ Beauty Bunker
swatch (1 swipe)

I was disappointed that it didn't actually give off the color it had in the pan. It's pretty much a colorless base with a ton of multi-colored sparkle. I wouldn't wear this alone unless I was going for a really understated eye. Oh well. It is called a shadow base so I will be using it for that instead. It may even work as an inner corner highlight. All in all, I don't think this is a product that is worth Php 400. I mean, really? Shrug.


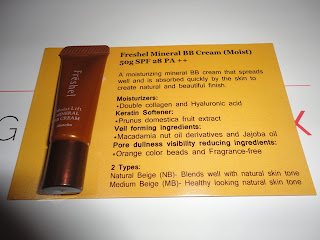
3. Kanebo Freshel Mineral BB Cream (Full size 5g / Php 960)

A moisturizing mineral BB cream that spreads well and is absorbed quickly by the skin to create a natural and beautiful finish.

Kanebo Freshel Mineral BB Cream @ Beauty Bunker
teenie tiny sample tube with an information insert.

Now, this is a product that looks promising. I have been looking for a good BB cream for a while now, so I am quite excited to try this one out. :)


4. Nippon Esthetic Solutions Wedge Sponges (Full size 62 pieces / Php 460)

These ergonomic wedge shape sponges are the best companion for makeup application. The wedge shape allows coverage in hard to reach areas for even application.


Nippon Esthetic Solutions Wedge Sponges @ Beauty Bunker
sponges

These look mildly interesting. I don't actually wear liquid or cream foundation so I really won't use these. However, these are quite handy to have in my stash so all's good.


And, I saved the best for last! Well, not really. 


5. KJI & Co Lips Staysss (Full size 2g / Php 410)

Lip Staysss semi-permanent lip balm doesn't bleed, or rub off - and the staying power is 50% greater than any other lipstick in town.

The claims of this product are quite appealing. After all, who doesn't like long-wearing lip stuff? On the tube of the product itself, they even added a claim that this product's "Color last through meals". (pardon the grammar. It's a Japanese product, methinks)

KJI & Co Lips Staysss @ Beauty Bunker
uber pretty packaging!

Now, here is a look at the product inside this lovely tube:

KJI & Co Lips Staysss @ Beauty Bunker
it's tiny as all lip balms are apt to be.


Now, with a product with uber pretty black and pink packaging, you would think that this would be a fantastic product. Well, brace yourself for my 100% completely honest opinion about this. 

I absolutely DETEST this product! *huff puff*

Yep. I hate it. So much so that I have no intention of putting it anywhere near my face ever again. I might even throw it away. Why? Let me enumerate the reasons for you.

  • It looks and feels UBER greasy on the lips.
  • It has absolutely NO color payoff whatsoever.
  • and it is one of the most HORRIBLE things I have tasted in my entire life. Really. It tastes like pure, melted plastic. It tastes like toxic spillage got onto your lips. Just thinking of the taste makes me shudder. No exaggeration. 
I don't know what's up with this product. I really wanted to like it but I was completely appalled by it! I've never experienced anything like it before! It may be that my sample was part of a bad batch or something, but really -- it's just a big NO for me. 


All in all, the January Glamourbox was a bit of a miss for me. This is especially since the previous boxes were awesome. Oh well.

If you want to get your own Glamourbox, then you can definitely do so here. I highly recommend getting a subscription if you are someone looking for new beauty products to try out like me! :)

Wednesday, January 23, 2013

Easy Dinner Recipes: Easy Chicken with Butter Parsley


Hi everyone!

I just wanted to share with you this really great recipe that I came up with the other night. It's Easy Chicken with Butter Parsley! :)

As I was staring at the pile of chicken breasts that I had thawed for our dinner, I realized that I had some parsely that I had just bought from the grocery. 

Well! That's when I was struck by the idea of doing a Chicken Kiev type of dish. Unfortunately, I didn't have cream cheese for it. Oh well. Time to improvise! 

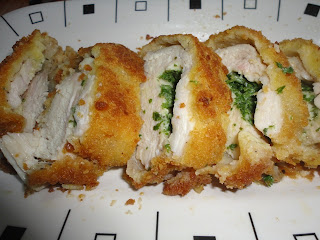
This is what I came up with:

Chicken with Butter Parsley @ Beauty Bunker
yum!

Since I didn't have any cream cheese, I simply substituted it with butter. Here is a recipe if you're interested.

Ingredients:
4 pcs        boneless chicken breast fillets
1/4 cup     fresh parsley
1/2 stick   butter
2              eggs
1 cup       cornstarch
2 cups      Japanese breadcrumbs
salt and pepper to taste

Directions:
  1. Season the chicken breast fillets with salt, pepper, and whatever seasoning you like. 
  2. Cut a slit in the side of the chicken fillet, so as to make a "pocket" for the stuffing. Make sure you don't go all the way to the other side! (Another good tip is to make the opening slit smaller than the pocket inside to reduce the possibility of the stuffing spilling out.)
  3. Chop up the parsley and mix it well together with the cold butter, making sure that the butter does not melt.
  4. Stuff the parsley butter into each of the chicken fillets. No need to skewer them with a toothpick, but you are free to do so.
  5. Dip the chicken fillets in cornstarch, making sure to coat it well.
  6. Dip in egg.
  7. Dip in breadcrumbs.
  8. Deep fry in about an inch of oil in a pan. Flip over when side has browned. Cook for about 5 minutes each side, flipping over thrice to make sure chicken is cooked through.
  9. Serve and enjoy!

Wasn't that easy? ;) I love this recipe and how absolutely sumptuous it turned out! Just like resto food, in my family's opinion. The best part is that this recipe is so inexpensive too! Here is the breakdown of the prices of the 3 main ingredients I used:

4 pcs chicken breast fillet                           - P90.00+
parsley (2 handfuls or about 1 cup)            - P4.00
butter (1 stick)                                               - P13.00    

All in all, I just spent around P107.00 for this dish that can feed 4-5 people easily! 

Chicken with Butter Parsley @ Beauty Bunker
note that this is only 1 piece of chicken fillet!

I highly recommend this recipe since it is quick, simple, and very inexpensive! Do try it and let me know how it turned out for you. ;)    


Monday, January 21, 2013

FOTD # 2: Dark eyes & nude pink lips


Hello everybody!


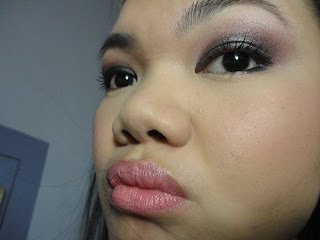
I just wanted to share with you a quick FOTD -- dark eyeshadow and nudey pink lips! This is a great look for going out at night. 


If you want to look like this...

@ Beauty Bunker
say what? o.o


Whoopsies! Awkward expression alert! Haha! ;) I meant, if you want to have a look like something like this:

now that's better :)
Then go ahead and keep reading. :)

This look is a pretty dramatic one. However, I have been loving wearing this look whenever I go out simply because on my particular eye shape (hooded lids which hide the shadow when I look straight ahead), it's not too too terribly dramatic. On other eye shapes though, this look may be better suited specifically for going out at night. :)

here is what my eyes look like when I look straight ahead. see what I mean? the dark eyeshadow is barely visible.


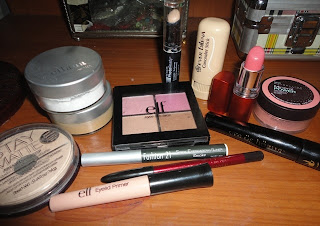
Now, here are the products that I used for this look. 


 FOTD #2 products used @ Beauty Bunker
Le Faerie eyeshadow palette @ Beauty Bunker

  
Here is a list:

FACE
EB Concealer Stick
Revlon PhotoReady Concealer
Ellana Minerals Primer and Foundation (product loves! review on this up soon)
Rimmel Stay Matte powder
ELF mini palette brown shadow for contouring

EYES
ELF eye primer
Fashion 21 Stick Eyeshadow/Liner in Smoke
EB black pencil eyeliner
Le Faerie Cosmetics Palette
Eye of Horus Mascara

CHEEKS
Maybelline Mineral Power Naturally Luminous Blush in True Peach

LIPS
Maybelline ColorSensational lipstick in Angel Rose


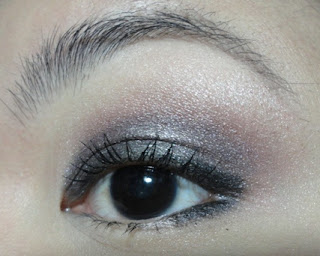
Here are some close up pictures so you can see better. 

smokey eye @ Beauty Bunker
pretty much a basic smokey eye.


FOTD #2 @ Beauty Bunker
eyes closed. didn't notice the awkward hair clinging to my lips!

FOTD #2 @ Beauty Bunker
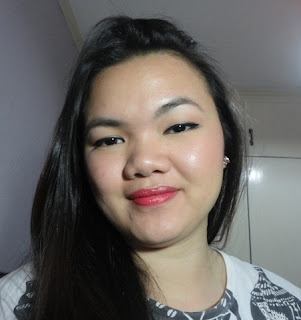
here is what it looks like when my eyes are open. you can also see the lovely pinky nudey shade on my lips (even with all the hair on it). :) 


*Quick tip: Always choose to accentuate either your eyes or your lips. Emphasizing both can be a bit too much for real life. (looks amazing in photos, though!)


So, here is how I did the eye makeup. 

1. Place the Fashion 21 stick eyeshadow all over the lids and blend out with a sponge tip applicator.

2. Pack a taupey silvery shimmery eyeshadow over the top of the black base.

3. Blend out hard edges around the crease area using a neutral brown shimmery eyeshadow.

4. Intensify the crease and outer-v with a purpley shimmery eyeshadow. This should be done right in between the silver shadow and the neutral brown shadow.

5. Place a matte cream highlight on the browbone.

6. Line eyes by smudging out a black eyeliner along the lashline and outer 1/4 of the lower waterline and lashline.


That's it! It's a pretty easy look if you don't want to spend too much time worrying about getting that outer-v just right. :) Try it out and you'll definitely love it. ;)

Friday, January 18, 2013

FOTD #1: Cat eye and Coral lips


Hi everybody!


For today's blog post, I just want to share my very first FOTD (or Face of the Day) Post! 
This is a super simple look which can be achieved in just a few minutes. :)


Beauty Bunker

A cat eye plus a brightly colored lips is a really great go-to look for when you are in a hurry and you don't necessarily have the time to worry about blending out eyeshadow colors. :)

Here is a picture of the products that I used.

L'oreal, Body Shop, ELF, Maybelline, Nichido, Ever Bilena @ Beauty Bunker

Face
EB Concealer stick
Maybelline Pressed Powder Foundation

Eyes
ELF eye primer (love this stuff!)
L'oreal Hip Eyeshadow Duo in Adventurous
ELF Shimmer Eyeliner pencil in Black
Nichido Length & Curl Mascara (review up on this!)

Cheeks
The Body Shop Lip & Cheek Stain
AVON Smooth Minerals blush in Radiance

Lips
Maybelline Watershine Pure lipstick CR31


Here is a close up of the eyes.

cat eye @ Beauty Bunker

For this look, I chose not to do a super dramatic cat eye simply because I didn't want to do so today. However, if you love sporting dramatic cat eyes, then you could definitely do so for this look! :)

You can also opt not to put any eyeshadow on the lids, but I put some on my since I had a bit of extra time to get ready.

Here is a close up of the eyes closed.

Beauty Bunker
Apply a cream colored base on the lids and blend out a taupe-y brown shadow lightly on your crease area for some dimension.


For the cheeks, I just dotted some of the cheek stain and blended it out using my fingers. I then topped it off with the loose AVON blush for a bit of a glow. :)

The lips are my favorite part! I just love this super lovely bright coral lipstick! You can sheer it out since it is more of a sheer formula, but it is definitely buildable. 

Maybelline Watershine Pure lipstick CR31 @ Beauty Bunker


Well, that's all for this super simple but fun look. 'Til next time! ;)


Tuesday, January 15, 2013

Mini-Haul #1: Genevieve Gozum Goodies!


Hello there!

For this post, I would like to share with you my itty bitty mini haul from Genevieve Gozum. :) It only consists of 2 things -- thus the use of "mini-haul". 

To be completely honest with you guys, I am not the type to buy things from Genevieve Gozum. It's simply not a store that caters to my tastes. :) 

However, while I was out one day with one of my friends at Trinoma, my friend told me that she needed to buy a belt. She then went on to say that there were really affordable belts on sale at Genevieve Gozum. Naturally, I immediately perked up at the idea. Hello, who doesn't like sales, diba? ;)


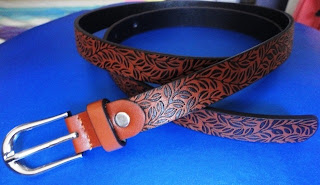
Soo, we went over to Genevieve Gozum and we immediately saw a belt rack at the entrance of the store promoting belts that were on sale for only Php 50.00! Having just bought a belt that costs Php 400, I immediately perked up at the idea. Soo, I browsed through the belts and found this little beauty here!


Genevieve Gozum belt with leaf design @ Beauty Bunker


Isn't it pretty? And it only costs Php 50.00 too! Here is a close up of the lovely leaf design on the belt.

Genevieve Gozum belt with leaf design @ Beauty Bunker

The belt is made of a leatherette material and I couldn't be more happy about purchasing it. Even my friend had to buy one like it after seeing how pretty this belt is! :)


Now, let's move on to the second item that I bought. A lovely collar necklace! 

Before I show you pictures of it, let me begin by saying that I have had a recent obsession on collar and statement necklaces as of late. I think it was brought about by watching the Pretty Little Liars series and seeing Aria Montgomery's style (which I absolutely adore!).Haha. :) 

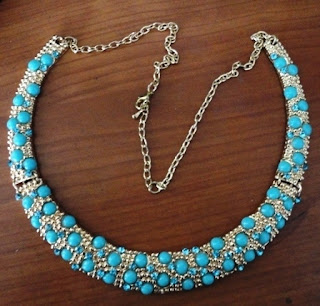
Anyhow, I loved the fact that I was able to find a gorgeous collar necklace at Genevieve Gozum. Not only that, but I was able to find one that only costs Php 175.00! What a bargain! :) 

Here is a picture of my lovely turquoise collar necklace. 

Genevieve Gozum turquoise collar necklace @ Beauty Bunker
Isn't it just gorgeous? :)


I am currently loving turquoise accessories and I have no idea why. I used to detest the color since it's the color of my High School uniform, but now I am totally obsessed with it! 

Anyway, here are some close up shots of the details on the necklace.

Genevieve Gozum turquoise collar necklace @ Beauty Bunker
See the stunning little light blue crystals embedded on the collar? :)

Genevieve Gozum turquoise collar necklace @ Beauty Bunker
Soo pretty!


All in all, this little mini-haul has changed my perspective of the Genevieve Gozum store. I'll make sure to check it out the next time I go shopping and see if I can get any more great buys! :) 'Til then! 


Baking Goodies: Butterscotch Brownies


Hello everyone!


I just wanted to share with you my latest baking creation -- Butterscotch Brownies! Here is a picture. 

Butterscotch Brownies @ Beauty Bunker
Sorry for the less than perfect picture. I'm still trying to get the hang of this blogging business! ;)


I just love how these turned out so I want to share the recipe I used. :) Are you ready? Here it goes. 


Prep Time:                      5 mins.
Cooking Time:                ~15 mins.
Total Cooking Time:       ~20 mins.
Ingredients:

3/4 stick        butter or margarine
1 cup             *packed brown sugar
3 tbsp           milk
1                   large egg
1 1/2 cup      all purpose flour
1 tsp             baking powder
1 1/2 tsp       vanilla
1/2 tsp          salt
nuts, chocolate chips, etc (optional)


Directions:
  1. Heat your oven to 350⁰ F.
  2. Grease your pans with a bit of butter.
  3. Melt your butter in a medium sized pan. Make sure not to burn it!
  4. Remove the pan from heat and mix in the brown sugar, milk, egg, and vanilla.
  5. Mix well.
  6. Stir in the flour, baking powder, and salt.
  7. If you wish to add nuts, chocolate chips, etc to your butterscotch, do so now. 
  8. Spread the mixture evenly into your pans. 
  9. Bake for 15 minutes.
  10. Check on the butterscotch to see if it has cooked through. Do this by poking a knife into the mixture. If it comes out clean, you're done!
  11. If the butterscotch is slightly squishy, let it cook for about 3-5 minutes more.
  12. You must take the butterscotch out when it is the slightest bit squishy on the top layer to ensure that you get nice and chewy butterscotch brownies. 
  13. Enjoy!
 

* For you baking newbies out there, packed means you pretty much have to squish the ingredient into the measuring cup and fit in as much as you can. 
(i.e. push as much brown sugar as you can into your measuring cup using a spoon, etc.)

This is different from simply scooping the ingredient in the regular manner, trust me. 


** This recipe is good for 2  6x12x1 inch baking pans.
Here is a picture of how the butterscotch looked right after I got it from the oven. On the first picture I posted above, I simply topped off the butterscotch with some powdered sugar. 


Butterscotch Brownies @ Beauty Bunker

Ideally, I would've liked to have gotten pictures to go along with the directions for baking this yummy pastry. However, I totally forgot to do so. I'll make up for it in my future baking posts if anyone's interested, though. Let me know! :)

I hope you try out this recipe! If you do, tell me how it turns out. :)

Nails of the Week: Neon Pink and Baby Pink


Hello guys!

I just want to post a picture of my current nail polish of the week. I may start a series of sorts for this kind of thing. Another thing I am quite interested in is nail art as well, you see. ;)

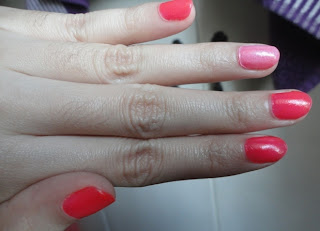
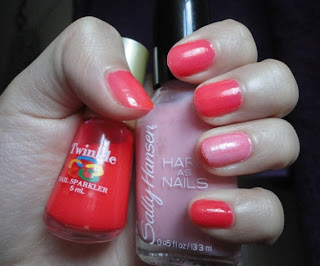
Here are some pictures of my nails! 

Nails of the Week: Pink Nails @ Beauty Bunker

Nails of the Week: Pink Nails @ Beauty Bunker

I am currently loooving the accent nail trend though I am well aware that I'm a little behind on it. ;) 

All I did was first put a layer of top coat on my bare nails, put on 3 layers of the neon pink on top, added the light pink color on my accent finger, and topped it all off with topcoat. :)

I used the following polishes on my nails:


Nails of the Week: Pink Nails @ Beauty Bunker


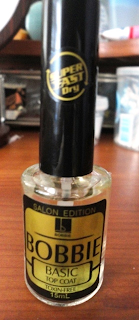
Here is my favorite top coat cum base coat ever! It is the Bobbie Super Fast Dry Basic Top Coat. It really does dry fast and it makes my polish last sooo much longer. It also works really well as a base coat to protect my nails from discoloration from any polish I use. Even when I don't want to wear colored nail polishes, I use this as a nice protective coat to give my nails the slightest bit of gloss -- nothing too shiny and it's very natural looking. :)

It retails for around Php 41.00 in department stores, etc. 

Bobbie basic top coat @ Beauty Bunker


Next up, this is the polish I used for the majority of my nails. It's the Twinkle Nail Sparkler in Neon Pink. I love how truly neon this color is! I also really like that this polish isn't goopy and yucky like how some other polishes can get after a while. It's a thin polish though, so I did have to use around 2-3 layers to get the color I wanted on my nails. 

Having to put on more layers of polish is way better than applying goopy, sticky polish in my opinion, though! ;) 

I also love that this polish only retails for around Php 17.75. It's mega affordable! The whole range of Twinkle nail polishes also only come in 5ml bottles. I actually prefer smaller nail polish bottles since I don't really use nail polish colors enough to actually finish a whole bottle. Think about it -- have you finished a full sized nail polish yet? 

Here is a shot of the back of the bottle. 

Twinkle nail polish in Neon Pink @ Beauty Bunker


The polish that I used for my accent color was the Sally Hansen Hard as Nails polish in #220 Solid as a Rock. It's a very pretty baby pink color packed with micro glitters. It doesn't really have that chunky glittery look that other glitter polishes have. It's also really pigmented! One swipe got me the color I have on my accent finger. 


I'm not sure how much this polish costs, though, since it was only given to me. I've been to SM Department stores where Sally Hansen polishes are available here in the Philippines, and I think that they are ridiculously expensive. I mean, Php 300+ for a nail polish? You have got to be kidding me. 


Here is another shot of my nails where you can see their true-to-life color. It doesn't quite catch the neon brightness of my nails, though. 


Nails of the Week: Pink Nails @ Beauty Bunker


That's pretty much it for my Nails of the Week! :) What do you think of the accent finger trend? Do you love it or hate it? :)

Review Time: The Sample Room Experience


Hello everyone!


This review is going to be about a really great website that I discovered semi-recently. It's called the Sample Room


So, what is this website all about? Well, it's basically about trying various products first to help you decide if you want to actually spend money on it. :)

What happens on this site is you get to choose a product that you want to try out of the currently available stocks that the website has. You can pretty much get any product that you want, provided that you have the necessary points for it. (More about that later) 

Once you have chosen your products, you are directed to the checkout page where you will be informed how much you will have to pay for the shipping only for the products that you ordered. You can pay using various payment methods such as PayPal, GCash, Smart Money, and bank deposit.

After you have paid, all you have to do is wait, wait, wait patiently for your products to be delivered to your doorstep! Might I state that the delivery time took only 1 day for me. Talk about promptness! :) I have to say though, that I am from the Metro Manila area. Delivery for other areas may take a bit longer. 


Sample Room Points

Sample Room runs on the concept of using points to "purchase" the various items on the site. Upon registering your new account at the site, you will automatically be given 100 points to spend however you wish. ;)

The points that you have will basically be the currency you use on the site. 

How will you get more points? Well, you have three options:

1. Review the items you "purchased". 
By making a review about the items you got, you will be given back the points that you spent on your purchase, plus an extra 1 point. :)

However, it can't just be any review! You can make a short review provided that it actually shows your in depth opinion of the product, whether it be good or bad. Reviews consisting of only the words "Great!!" or "Eeeeww!" just won't cut it. ;)


2. Buy more points.
The site also gives you the option to buy more points if you are feeling too impatient to wait for your points to come. ;) This option is still in the works, though. 


3. Refer your friends.
By referring people to the site, you get an additional 1 point. :)


As you can see, the whole concept of the site is a really really good one. All you have to do in exchange for free samples is to write reviews on it -- no strings attached! :) 

Without spending more than around Php 100 (for shipping), you will be able to get samples or even full sized products from various brands such as Celeteque, AHAVA, Bobbi Brown, Benefit, Calvin Klein, Ralph Lauren, Kiehl's, Laneige, and more!  
 

I got myself stuff from Sample Room and I got two full sized Celeteque items: 

Their Celeteque DermoScience Brightening Eye Tuck plus Dark Circles Lightener (which I made a review on) 
Celeteque DermoScience Brightening Eye Tuck plus Dark Circles Lightener @ Beauty Bunker


and their Anti-wrinkle Collagen Gel. 

Celeteque DermoScience Anti-Wrinkle Collagen Gel @ Beauty Bunker


The eye cream retails for Php 299, while the collagen gel goes for Php 779. From Sample Room, I was able to get both of them for only Php 100 -- the shipping fee! That's pretty amazing in my opinion. :)

This site really is great for people who want to really test out products first before shelling out the big bucks for them. :) I highly recommend that you take advantage of this really amazing site ASAP! More and more people are learning about this site and that means more competition to get those oh-so-amazing and highly limited samples that this site can offer. 

Well, you don't expect to get those amazing samples without a bit of competition now, did you? Good luck! ;)